Creating & Sending Estimates
Learn how to create price estimates for your clients, add line items, send them via email or SMS, and convert accepted estimates into invoices
Creating & Sending Estimates
Estimates let you provide clients with a detailed price quote before any work begins. You can add line items, send the estimate by email or SMS, and once the client accepts, convert it directly into an invoice with one tap.
Why use Estimates?
- Give clients a clear picture of costs before committing to a project
- Present a professional, branded PDF document with your company details
- Track the status of every estimate — from draft to accepted
- Convert accepted estimates into invoices instantly, carrying over all line items
- Keep a record of all estimates tied to clients and jobs
Creating an Estimate
Step 1: Open the Estimates Screen
- Open the KorField Pro mobile app or web dashboard
- Tap Estimates in the side menu
- Tap the New estimates button in the top-right corner
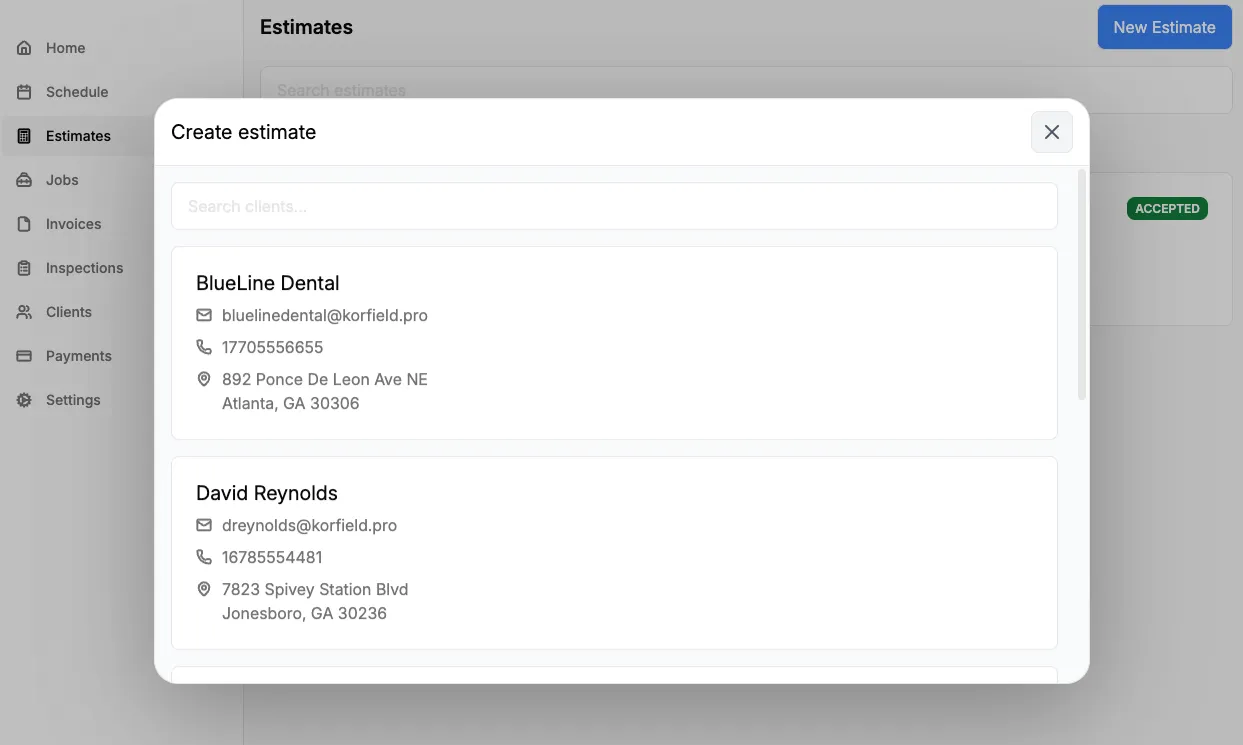
Step 2: Select a Client
- Search for an existing client by name
- Tap the client to select them
- A new estimate will be created and you’ll be taken to the estimate details screen
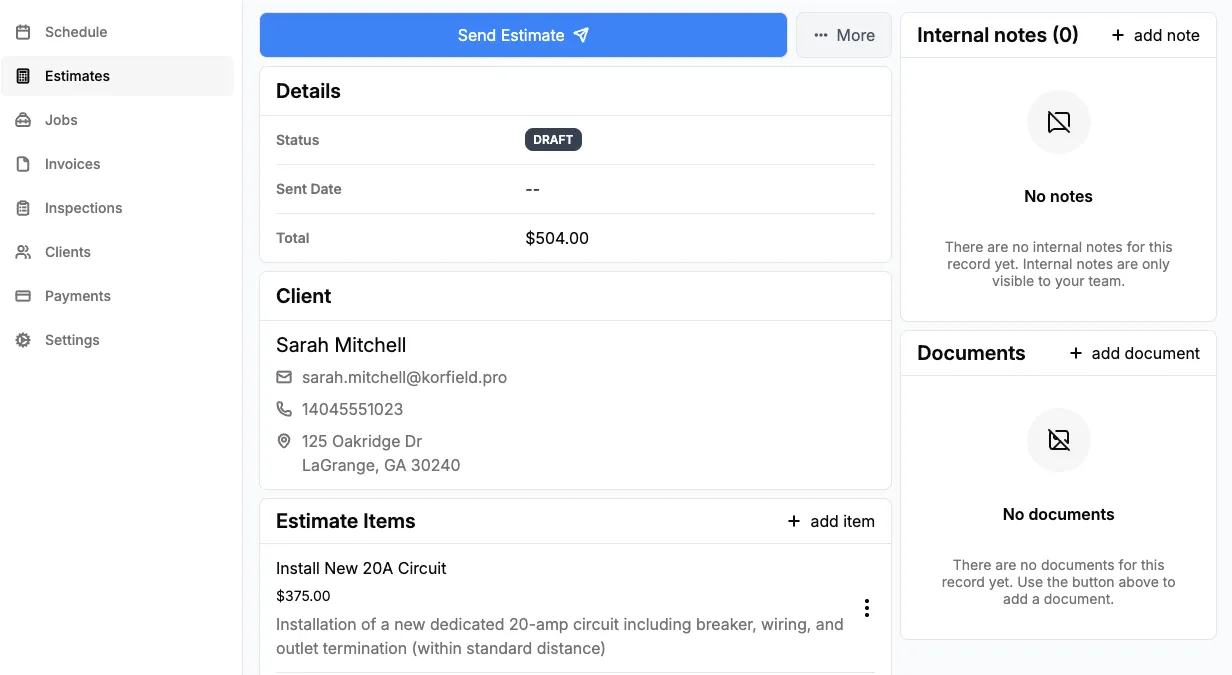
Adding Line Items
Once your estimate is created, you’ll need to add the services or products you’re quoting.
Step 1: Add an Item
- On the estimate details screen, find the Estimate Items card
- Tap add item
- Search for an existing service or enter a custom item name
- Set the price for the item
- Optionally add a description for more detail
- Tap Save
Step 2: Review Your Items
After adding items, they’ll appear in the Estimate Items card with the total calculated automatically at the bottom.
- To edit an item, tap the three-dot menu on the item and select Edit
- To delete an item, tap the three-dot menu and select Delete
Adding a Client Note
You can add a note that will appear on the estimate PDF your client receives. This is useful for terms, conditions, or any additional context about the quote.
- Scroll down to the Client Note card
- Type your note
- Tap outside the text area — the note saves automatically
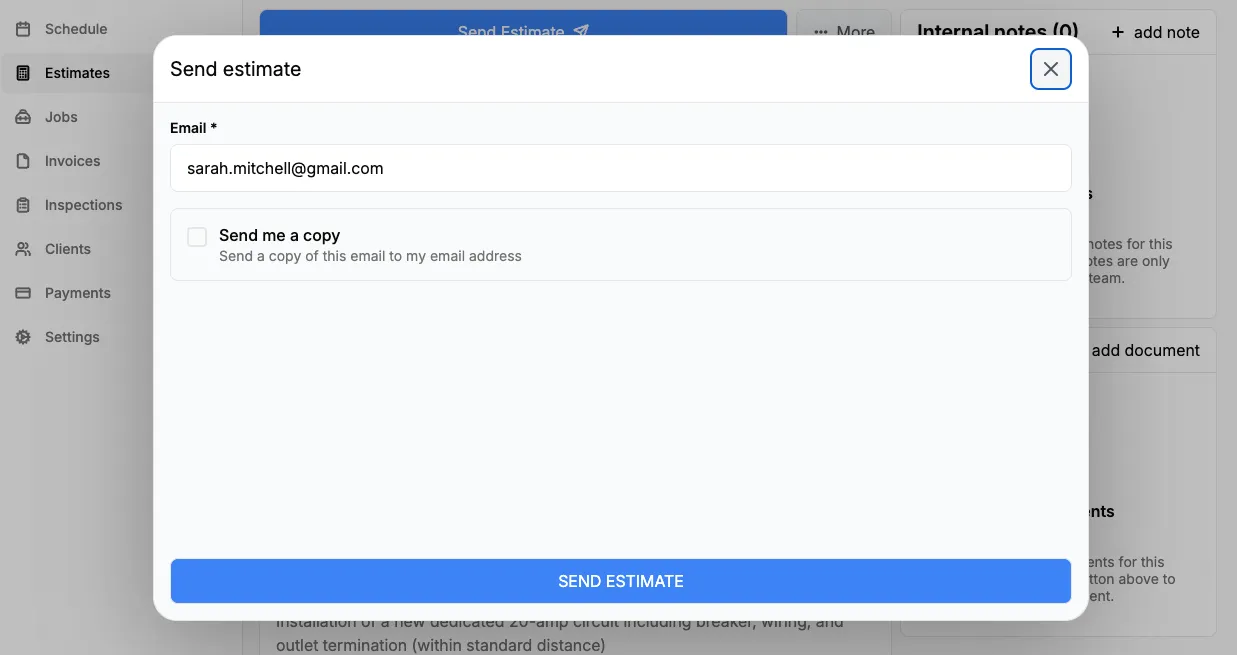
Sending an Estimate
When your estimate is ready, you can send it directly to your client by email or SMS.
Step 1: Tap Send
- On the estimate details screen, tap Send Estimate
- Choose email, SMS, or both
- Confirm the recipient details
- Optionally check Send me a copy to BCC yourself on email sends
- Tap SEND ESTIMATE
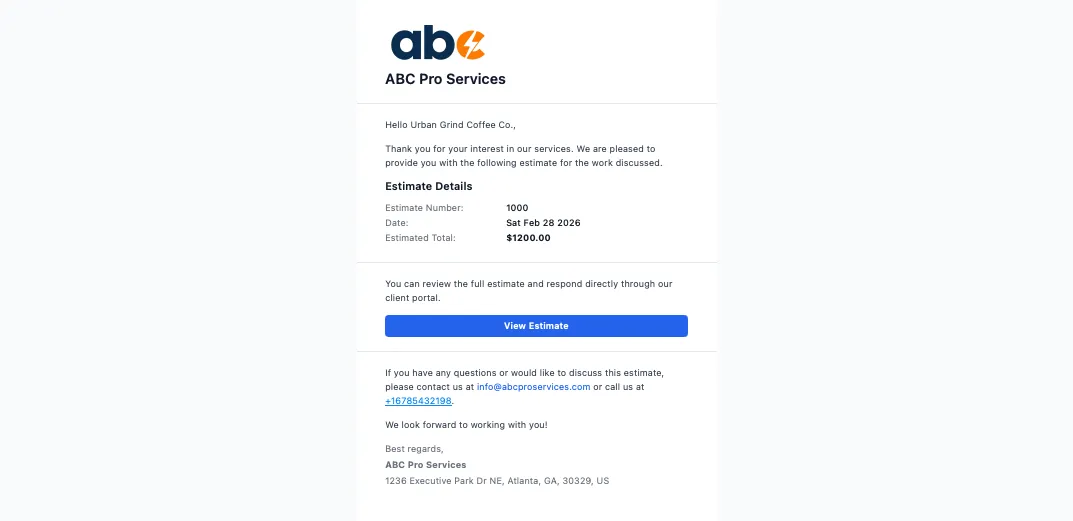
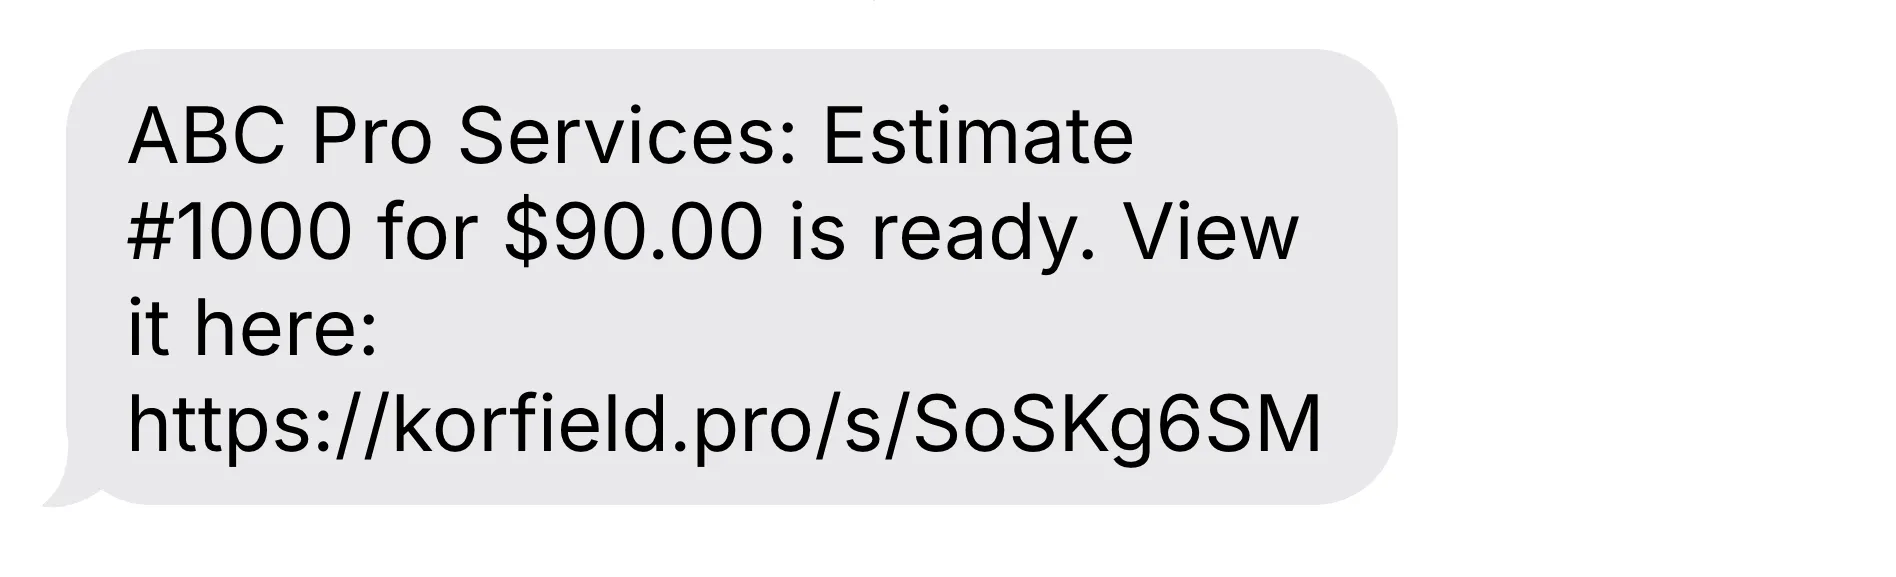
What Your Client Receives
Your client will receive:
- Estimate number and date
- A secure portal link to review and respond
- For email sends: a professional email with your branding and a PDF attachment
- For SMS sends: a text message with estimate details and a short link to the portal
Client Portal
When you send an estimate, your client gets a link to the client portal where they can review the estimate details and respond — no phone calls or emails back and forth needed.
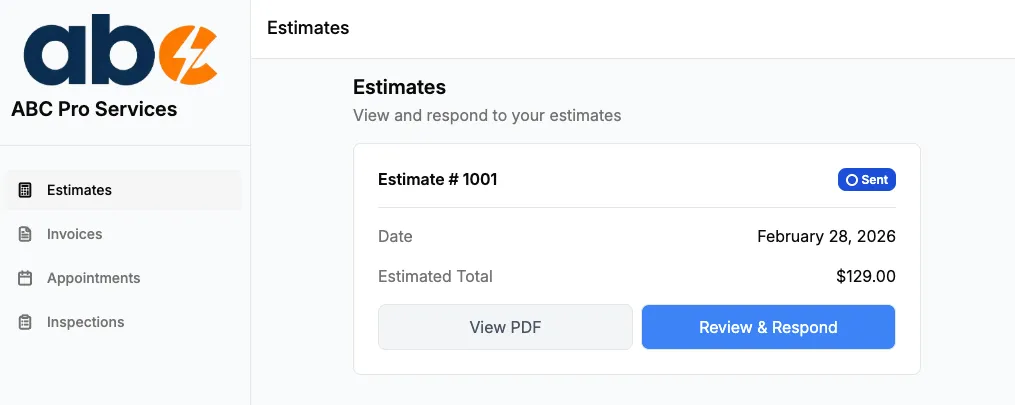
What Your Client Sees
When clients open the View Estimate button in their email, they’re taken to the Estimates tab in the client portal. Here they can:
- See all estimates you’ve sent them, with status badges and totals
- Tap View PDF to open the full estimate document
- Tap Review & Respond on any estimate with a Sent status
Reviewing & Responding
When a client taps Review & Respond, they see the full estimate details including:
- Estimate number and date
- All line items with names, descriptions, quantities, and prices
- The estimated total
- Any client note you’ve added

At the bottom of the screen, two buttons let the client respond:
- Accept — Marks the estimate as accepted and notifies you. You can then convert it into an invoice.
- Decline — Marks the estimate as rejected and notifies you.
Both actions require a confirmation dialog, so clients can’t accidentally accept or decline.
After a Client Responds
Once a client responds:
- You’re notified right away — the moment a client approves an estimate, you’ll get a notification so you can get the work scheduled without checking back
- The estimate status updates immediately in your dashboard
- You’ll see the estimate move from Sent to Accepted or Rejected
- When a client approves, a copy of the approved estimate is saved automatically to the job’s documents for your records
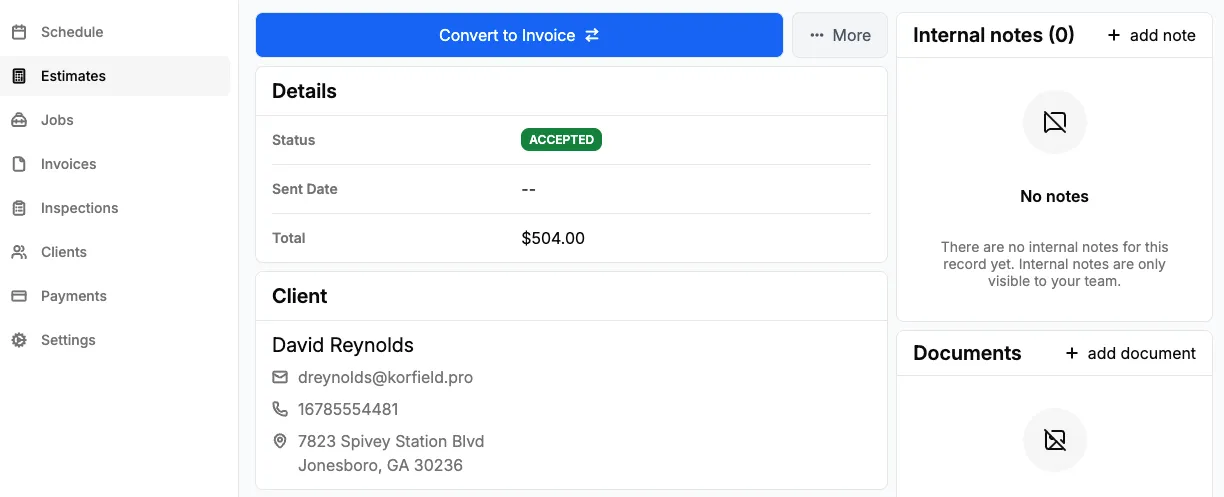
- If accepted, the Convert to Invoice button becomes available on the estimate details screen
- The client can no longer change their response — the Accept and Decline buttons disappear
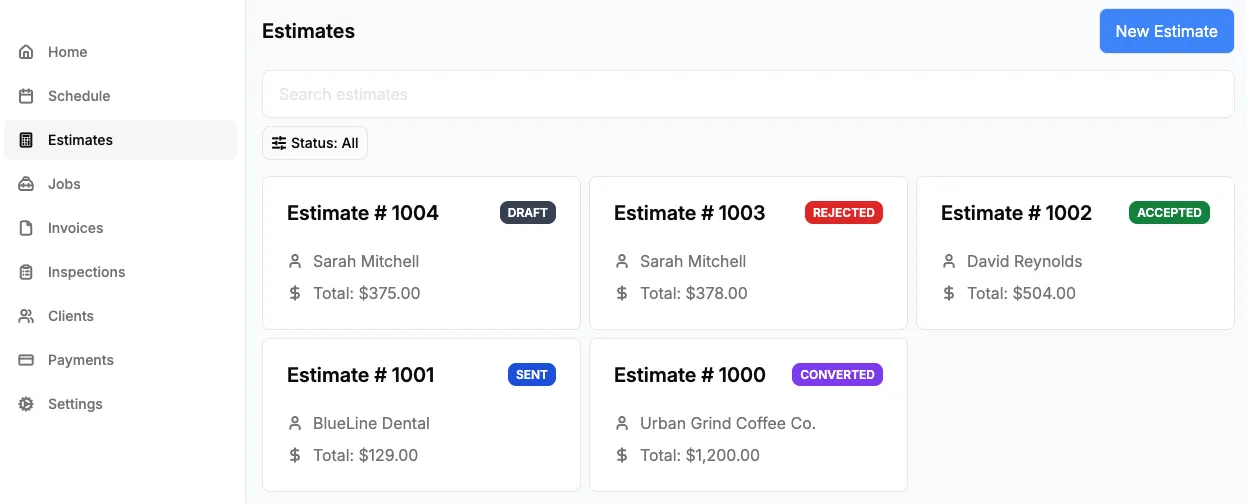
Understanding Estimate Statuses
Every estimate has a status that tells you where it is in the workflow:
| Status | Meaning |
|---|---|
| Draft | The estimate has been created but not yet sent to the client |
| Sent | The estimate has been sent to the client (email and/or SMS) |
| Accepted | The client has accepted the estimate |
| Rejected | The client has declined the estimate |
| Converted | The estimate has been converted into an invoice |
Filtering by Status
On the estimates list screen, you can filter by status to quickly find what you’re looking for:
- Tap the Status filter button at the top of the list
- Select a status to filter by, or choose All to see everything
Converting an Estimate to an Invoice
Once a client accepts your estimate, you can convert it into an invoice with one tap. All line items are automatically copied over.
How to Convert
- Open the accepted estimate
- Tap Convert to Invoice (the primary action button)
- You’ll be redirected to the newly created invoice with all items already added
You can also find the convert option in the More menu on the estimate details screen.
Important: Only estimates with an Accepted status can be converted. Once converted, the estimate status changes to Converted and cannot be sent again.
Managing Estimates
Viewing an Estimate PDF
To preview or share the estimate document:
- Open the estimate
- Tap More → View estimate
- The PDF preview will open
- Use the share button to export or save the PDF
Deleting an Estimate
- Open the estimate
- Tap More → Delete estimate
- Confirm the deletion
Note: Deleting an estimate also removes all associated documents, notes, and line items. This action cannot be undone.
Adding Notes & Documents
Each estimate has sections for internal notes and file attachments:
- Notes — Add internal notes that are only visible to your team (not included in the client-facing PDF)
- Documents — Attach reference files, photos, or supporting documents to the estimate
Best Practices
For Business Owners
- Add detailed descriptions — Include descriptions on line items so clients understand exactly what they’re paying for
- Use the client note — Add terms, timelines, or conditions in the client note field so they appear on the PDF
- Send promptly — The faster you send an estimate, the more likely the client is to accept
- Follow up on sent estimates — Check the estimates list filtered by Sent status to see which quotes are still pending
For Your Clients
When communicating with clients about estimates:
- Let them know to check both email and text messages for the estimate link
- Mention the estimate number so they can reference it easily
- Remind them they can accept or decline directly from the portal link — no need to call or reply
- Explain that once they accept, you’ll convert the estimate into a formal invoice
Troubleshooting
Estimate Message Not Received
If your client says they did not receive the estimate:
- Verify the client’s email and phone number are correct on their profile
- If sent by email, ask the client to check spam or junk folders
- Resend using the other channel (email or SMS)
- If the issue persists, contact support
Cannot Convert to Invoice
If the Convert to Invoice option is not available:
- Verify the estimate status is Accepted — only accepted estimates can be converted
- If the status is Converted, the estimate has already been turned into an invoice
- If the status is Draft or Sent, the client needs to accept the estimate first
Items Not Showing on PDF
If line items are missing from the estimate PDF:
- Make sure you saved each item after adding it
- Refresh the estimate details screen
- Try viewing the PDF again from More → View estimate
Frequently Asked Questions
Can I edit an estimate after sending it? Yes, you can still add, edit, or remove line items and update the client note after sending. However, the client will not see the changes unless you resend the estimate.
Can I create an estimate without a client? No, every estimate must be associated with a client. Create the client first from the Clients screen, then create the estimate.
Can I link an estimate to a job? Yes, estimates can be associated with a job. This helps you track which estimates belong to which projects.
What happens to the estimate after I convert it to an invoice? The estimate status changes to Converted and all line items are copied to the new invoice. The original estimate is preserved for your records.
Can I convert an estimate to an invoice more than once? No, each estimate can only be converted once. If you need a new invoice, you can create one manually.
Is there a limit to how many items I can add to an estimate? No, you can add as many line items as needed.
How do clients accept or decline an estimate? When you send an estimate, clients receive a portal link by email or SMS. They open the link, review the line items and total in the client portal, and then tap Accept or Decline. The status updates immediately in your dashboard.
Can a client change their response after accepting or declining? No, once a client responds the decision is final. If a client wants to reconsider, you can create a new estimate and send it to them.
Does the client need an account to view the estimate? No. The secure link in the email or text message includes a token that gives them access to the client portal without needing to create an account or log in.
Need More Help?
Have questions about estimates or running into issues? Contact our support team at support@korfieldpro.com or visit our help center.